Running a commercial waste audit is one of the fastest ways to understand what your business is throwing away, what it’s costing you, and where day-to-day habits are creating avoidable overflow. This checklist is for facility managers, office admins, restaurant operators, property managers, and anyone responsible for dumpsters, recycling carts, or janitorial coordination. A solid audit helps you right-size service, reduce contamination, and set clear expectations with staff and tenants—without turning waste into a full-time job. As routines shift in the fall, it’s also a practical moment to reset collection areas and signage before busy end-of-year schedules pile on. For a local expert in commercial waste, explore AAA Sanitation‘s service options for business waste and recycling pickup.
Key Points to Know First
- Define the goal before you count anything. Decide whether you’re targeting cost control, cleaner recycling, fewer overflows, or better tenant compliance.
- Measure what you control. Start with your own dumpsters/carts and collection areas before trying to solve upstream purchasing and packaging.
- Track volume and “why,” not just pounds. Overfilled bins, excess cardboard, and food waste patterns often reveal operational fixes.
- Contamination is a process problem. Mixed materials usually point to confusing signage, poor bin placement, or inconsistent training.
- Small changes can show results quickly. Lid management, container placement, and scheduled breakdown of boxes often reduce overflow and mess.
How a Commercial Waste Audit Works in Real Life
A waste audit is a structured look at what your site generates, how it’s collected, and where it ends up—so you can make practical adjustments. You don’t need a lab or a complicated model. You need consistent observations and a simple method.
- Scope: Choose buildings, tenants, or departments included in the review.
- Inventory: List containers (dumpsters, carts, compactors), sizes, and where they’re staged.
- Observation window: Pick a representative period (for example, a normal operating week) to avoid one-off events skewing the picture.
- Material review: Note the big drivers—cardboard, food waste, packaging, restroom waste, landscaping debris, and “mystery bags.”
- Behavior review: Watch the points where waste decisions happen: breakrooms, loading docks, tenant trash rooms, and janitorial staging.
The output should be a short, usable set of findings: what’s filling up, what’s contaminating recycling, where overflow happens, and what to change first.
Why Timing and Details Change Your Costs
Waste problems rarely stay “just messy.” They tend to show up as extra pickups, overflow cleanups, blocked enclosures, pest pressure, or frustrated tenants and staff. An audit helps you connect the dots between what’s in the bin and what it’s doing to your budget and workflow.
- Overflow and extra service: Overfilled containers can lead to additional hauls or site labor to manage spillover.
- Contaminated recycling: When materials are mixed, recycling loads may be handled differently depending on local rules and provider policies—confirm requirements locally.
- Safety and access: Loose debris and blocked enclosure gates increase slip/trip risk and slow down pickup.
- Operational drag: If staff spend time “fixing the trash,” you’re paying for avoidable busywork.
Common Audit Mistakes That Skew the Results (Checklist)
- ✓ Auditing during an abnormal week. Inventory deliveries, holidays, move-outs, or special events can distort your baseline.
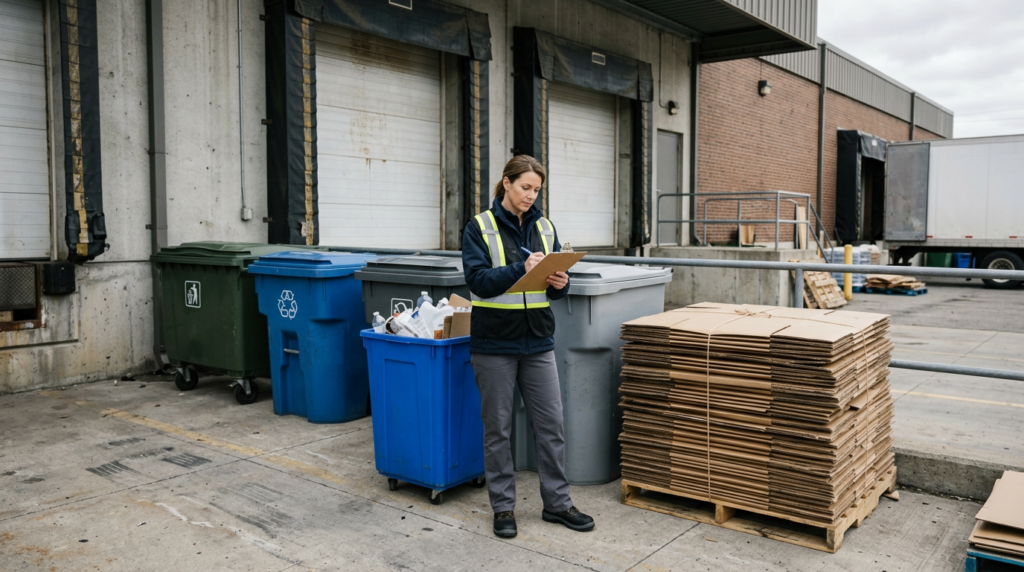
- ✓ Ignoring the loading dock. Cardboard and packaging often peak where deliveries are received, not where customers see.
- ✓ Counting containers but not container behavior. Lid propping, side-bagging, and “temporary piles” are clues that capacity or placement is wrong.
- ✓ Skipping contamination notes. “Recycling is full” is less useful than “recycling is full of bagged trash and food containers.”
- ✓ Not separating tenant vs. house waste. In multi-tenant properties, you need to know who is driving volume and contamination.
- ✓ Overcomplicating the data. A simple tally sheet and photos (for internal use) beat a spreadsheet no one updates.
A High-Priority Action Plan You Can Use This Week
- ✓ Set your audit goal (Priority: High). Pick one primary outcome: fewer overflows, cleaner recycling, or right-sized service.
- ✓ Map every waste point (Priority: High). Breakrooms, restrooms, copy rooms, kitchens, tenant trash rooms, and the dock all count.
- ✓ List every container with location and purpose (Priority: High). Include enclosure layout and any access issues (tight turns, blocked gates).
- ✓ Run a 5-day observation log (Priority: High). Note fullness at pickup time, overflow incidents, and the top three materials you see.
- ✓ Fix the “easy wins” immediately (Priority: High). Add cardboard breakdown expectations, move bins closer to where waste is created, and remove “junk bins” that attract contamination.
- ✓ Standardize signage and bin pairing (Priority: Medium). Put trash and recycling side-by-side where people make the decision.
- ✓ Create a simple tenant/staff one-pager (Priority: Medium). Keep it visual: what goes where, what never goes in recycling, and who to contact when bins are full.
- ✓ Re-check after changes (Priority: Medium). Repeat a shorter 2–3 day log to confirm the fix actually reduced overflow or contamination.
Downloadable summary: Copy this into a document for your team—Goal → Container map → 5-day log → Easy wins → Signage/bin pairing → One-pager rules → Re-check.
In-page checklist + tally sheet template (copy/paste into a doc or spreadsheet):
| Field | What to record (typical) |
|---|---|
| Date / time | Before pickup, after lunch rush, end of shift, etc. |
| Area | Dock, breakroom, tenant trash room, kitchen, office copy room |
| Container ID | Dumpster A, Recycling Cart 3, Compactor, etc. (add a label if needed) |
| Stream | Trash / Cardboard / Mixed recycling / Organics (only if you have service) |
| Fullness (visual) | 25% / 50% / 75% / 90%+ (use the same scale all week) |
| Overflow? | Y/N + where (ground, enclosure, hallway) + cleanup time estimate |
| Top materials seen | Top 3: cardboard, shrink wrap, food containers, paper towels, etc. |
| Contamination items | Bagged trash in recycling, food/liquids, foam, plastic film, etc. |
| Likely cause | Delivery day, shift change, event, cleaning schedule, bin too far, unclear label |
| Photo? | Y/N + filename (keep internal; avoid capturing faces or private info) |
| Action idea | Move bin, add sign, add breakdown station, adjust schedule, lock lid, etc. |
Professional Insight: The Small Detail That Changes Everything
Typical audit takeaway (industry-wide): The biggest improvements often come from fixing the “decision point”—the exact spot where someone tosses an item. If recycling is farther away than trash, lids are hard to open, or labels are vague, people default to the easiest option.
Typical rule of thumb (industry-wide): Better placement and clearer labels often outperform adding more containers—especially in breakrooms, copy areas, and loading docks—because the goal is to make the correct choice the simplest choice.
Photo documentation rules (practical, typical):
- Take photos at consistent times (for example, right before scheduled pickup) so comparisons are fair.
- Capture the context: include the sign, the bin opening, and nearby “decision point” area in the frame.
- Avoid people and sensitive info: no faces, license plates, customer paperwork, or tenant identifiers.
- Name files consistently: YYYY-MM-DD_Area_Container_Stream (example: 2026-10-07_Dock_DumpsterA_Trash).
Sample “findings → fix” mapping (typical examples):
- Cardboard peaks on delivery days → add a dedicated breakdown station (box cutter + bale/tie area), require flattening, and consider adjusting pickup cadence around delivery volume.
- Recycling cart is full of bagged trash → remove liners from recycling (where appropriate), pair trash + recycling together, and use “NO BAGS”/“EMPTY & DRY” style labels that match local acceptance.
- Overflow happens after shift change → add a mid-day pull to the dock, assign responsibility by role (not “everyone”), and verify enclosure access is unlocked/clear.
- Food/liquids in recycling → add a “liquids/food dump” step near sinks, place trash closer than recycling in food-prep zones, and use simple visuals on signs.
- Loose debris around the enclosure → add a lidded cart for “extra bags,” keep lids closed, and set a quick daily sweep standard to reduce pests and slip hazards.
When DIY Tracking Isn’t Enough
- Recurring overflow: Bins are regularly over capacity even when staff “do everything right.”
- Multiple tenants or departments: Shared enclosures create accountability problems that need a structured plan.
- Persistent contamination: Recycling is repeatedly filled with bagged trash, food waste, or mixed materials.
- Access or safety issues: Enclosures are blocked, gates are hard to open, or loose debris creates hazards.
- Service uncertainty: You’re not sure if your current setup matches your actual waste stream or operations.
Common Questions Answered
How long does a business waste review usually take?
Many sites can gather useful information in a normal operating week by logging container fullness, overflow, and the main materials showing up. Larger or multi-tenant properties may need a longer observation window.
Do we need to physically sort trash to get value from an audit?
Not always. Visual checks of what’s visible at the top of containers, combined with volume tracking and overflow notes, can reveal practical fixes. If you choose hands-on sorting, use appropriate PPE and follow site safety rules.
What should we track besides how full the dumpster is?
Track what’s driving volume (like cardboard or food waste), where overflow happens, and common contamination items in recycling. Also note operational causes such as delivery days or shift changes.
Will improving recycling automatically lower our waste costs?
Not automatically. Cost impacts depend on your service setup, local processing rules, and how consistently materials are separated. Confirm options and requirements with your provider and local guidelines.
Where to Go from Here
A checklist-based audit gives you clarity without guesswork: what you generate, where it piles up, and what’s causing contamination or overflow. Start with a tight scope, log what you see for a representative week, and fix the decision points first. If problems persist, bring in help to right-size containers and tighten the process.
Want More Information?
Athens/Clarke County “confirm locally” checklist (use before you print signs):
- Verify who sets your rules: acceptance and contamination standards can be set by the City of Athens-Clarke County for municipal programs and/or by your specific hauler/recycling processor for commercial service.
- Confirm accepted materials for your service type: mixed recycling vs. separated streams; whether cardboard is collected with mixed recycling or needs its own container.
- Ask about common contamination triggers: many programs restrict bagged recyclables, food/liquids, foam, and plastic film/bags—but the exact list varies by provider and processing facility.
- Check “empty, clean, dry” expectations: confirm how strict your provider is about residue in bottles/containers and whether rinsing is required or simply emptying is sufficient.
- Confirm special items handling: pallets, scrap metal, e-waste, batteries, fluorescent bulbs, and cooking oil often require separate handling—confirm the correct local drop-off or vendor route.
- Align signage to your confirmed rules: use the same words your provider uses (example: “No plastic bags/film” if that’s a rule for your stream).
Use the in-page tally sheet above as your working checklist. If you want help setting up business waste and recycling service in Athens, reach out below.